App of the Week: Google Chrome

11 Chrome features you’ll wish you’d known all along


By Matt Elliot of CNet

Do you consider yourself a Chrome ninja? If not, these tips can help you navigate the web with deadly efficiency.

Pin tabs

I spend much of my day using Gmail and Google Drive, and with Chrome’s tab-pinning feature, I can keep those tabs parked to the left of all of my many open tabs. It’s a great way to keep the tabs you’re constantly visiting and revisiting within an arm’s reach. To pin a tab, just right-click it and select Pin Tab. It will move to the left of your tabs where it will stay readily available. Better yet, the size of the tab shrinks to give you more room to juggle the rest of your open tabs.

Mute tabs

Where is that sound coming from? Chrome identifies which tabs are playing audio by placing a little speaking icon on the tabs making noise. If a video starts playing on one of your background tabs, look for the little speaker icon. To mute its audio, right-click the tab and hit Mute Tab. You’ll mute the offending tab without leaving your current tab.

Block autoplay videos

If you find yourself constantly muting tabs, why not just put a stop to autoplay videos altogether? Type chrome://flags/#autoplay-policy into Chrome’s URL bar, which will open Chrome’s list of features Google is testing out, but have yet to make it into the official release. For the autoplay policy, select Document user activation is required and then click the Relaunch Now button.

Block notification requests

After autoplay videos, my least favorite part about browsing the web are the constant requests from sites asking me if I’ll let them show me notifications. My answer is always “block.” Thankfully, there is a way to tell Chrome to stop sites from asking. Open Settings and scroll down to the bottom and click Advanced. In the Privacy and security section, click Content Settings. Next, click Notifications and then click the toggle switch so it goes from Ask before sending to Blocked.

Quickest way to a Google search

You probably know that you can use Chrome’s URL bar to do a quick Google search, but that’s not the fastest way. If you come across a word you want to look up, just right-click it and select Search Google for “_____” from the contextual menu and a new tab will open with Google search results for the word. You can also look up a phrase the same way by first highlighting the whole phrase and then right-clicking.

Zoom out to normal view

Frequently, my MacBook’s ($1,249.00 at Amazon.com) touchpad misreads a swipe or gesture and wildly zooms in on the page I’m reading. So I memorized the Command-0 (zero, that is) keyboard shortcut, which returns Chrome to the regular zoom level. (That’s Ctrl-0 for you Windows users.)

Select multiple tabs

If your open tabs have reached the point where you want to break off a bunch and move them into their own window, you can select multiple tabs by holding down Command (Mac) or Ctrl (Windows) and clicking the tabs you want to move. You’ll see that the tabs are highlighted in a lighter shade from your other tabs. With your tabs selected, you can release the Command or Ctrl button and then drag the tabs from the current window and they’ll all open in a new window of their own.

Reopen a closed tab

Accidentally closed a tab? You can bring it back by hitting Command-Shift-T on a Mac or Ctrl-Shift-T on a PC.

Start where you left off

Did you know you can tell Chrome to restart not with a blank page but where you left off, with all of your many tabs. I like to shut down my MacBook from time to time to keep it running smoothly, and I like to be able to pick up right where I left off in Chrome after a reboot. To do this, go to Chrome’s Settings, scroll down to the On startup area and select Continue where you left off.

See what’s slowing you down

Is Chrome acting sluggish? You can see if there is a particular tab that’s causing the slowdown by using Chrome’s built-in Task Manager. It shows which tabs are using the most CPU and memory resources. To open Chrome’s Task Manager, click the triple-dot button in the top right and go to More Tools > Task Manager. The small Task Manager window shows fluctuating percentages for each open tab and extension you have running in terms of CPU and memory usage. Highlight a tab or an extension and click the End Process to kill any egregious resource hog and reclaim some CPU and memory overhead.

Save time with autofill

Tired of entering your address or credit card info on web forms? You can save this information and have Chrome enter it for you. Go to Settings > Advanced > Passwords and forms > Autofill settings to save address and payment information with Chrome. When you come to a web form, you just need to enter the first letter or your name or first number of your credit card and Chrome will offer to fill out the appropriate boxes for you.


Do you have a favorite feature of Chrome? Tell us about it in the comments below!

Tips & Tricks: Top Five Time-Saving iPhone Tips


By Tim Hardwick of MacRumors

If you’re looking to cut down on the amount of time you spend performing certain actions on your iPhone, there’s usually a solution hidden in Apple’s mobile operating system. Here are five quick iOS tips that once you start using will make you a lot more time-efficient in the long run.

This article assumes you’re using an iPhone running iOS 11 or later, but some of these tips will work on iPad and earlier versions of Apple’s mobile OS. Read on for more.

1. Search a Web Page

In Safari on iOS, there are two ways to search a web page for a specific word or phrase. One method is quicker than the other, although neither is necessarily immediately obvious.


The first way involves tapping the Share icon (the square with an arrow pointing out of it), sliding your finger left along the bottom column, and tapping the Find on Page button, indicated by a magnifying glass. Start typing what you’re looking for, and your search results will be returned automatically.

The second, faster method is to type your search term straight into Safari’s address bar and then tap the On This Page option at the bottom of the suggestion list, after which you’ll be able to tap through each occurrence of the term on the current page.

2. Swipe to Delete in the Calculator

It’s a common misconception that if you type the wrong number into the Calculator app, you have to start the whole sum all over again. Happily, that isn’t the case: Simply swipe right or left with a finger across the number display to remove the last number you typed, and repeat the action if necessary to remove several numbers.

3. Access Deeper Control Center Options Sans 3D Touch


In iOS 11, the Control Center is designed to reveal deeper controls when the user hard-presses to activate 3D Touch – just try it on the camera button, for instance.

If you own an iPhone SE or an older iPhone that doesn’t support 3D Touch gestures, it’s still possible to access these more granular controls on any button that supports them by using a simple long press instead.

4. Quick-Switch Back From Numbers/Symbols to Letters

Switching onscreen keyboards when you need to type a number or symbol is an all-too-often occurrence on iPhone, so here’s a tip for making the transition super-swift.

Rather than tap the “123” key to switch to the number/symbol keyboard, hold down on it and slide your finger over to the key you want, then let go. This single action types the number/symbol and automatically switches you back to the alphabetical layout, avoiding the need to perform three separate taps to achieve the same result.

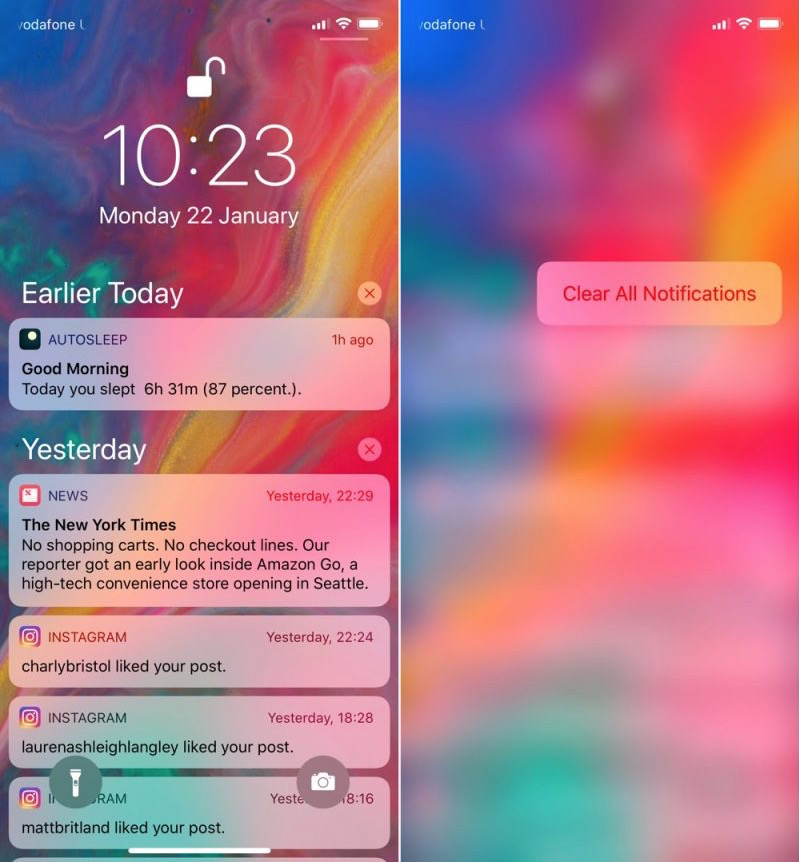
5. Clear All Notifications At Once

If you’ve got a bunch of notifications from earlier in the day or week that are clogging up your Notifications Screen, don’t waste time clearing them one by one. Simply hard press on the first x icon you see on the right of the list. From there, you only need to select the Clear All Notifications 3D Touch option to make them instantly vanish.

Do you have an best practices for navigating your iPhone? Tell us about them in the comments below!

App of the Week: Firefox


3 awesome features coming to Firefox that you can get right now

By Matt Ellliot of CNet

The upcoming Firefox 59 will help you stop sites from asking for permission to send you notifications and know your location, but you can stop these right now in the current build of Firefox with a little digging.

When Firefox 59 is released in March, it will add controls for setting permissions for how the browser accesses your location along with your computer’s camera and microphone. It will also include a global setting for blocking sites from asking to be allowed to send you notifications.
These settings will be most welcomed — particularly the ability to shut off those annoying requests that sites pop up asking if it’s OK to send you notifications — but you can access those if you are willing to dip into Firefox’s advanced settings in about:config.

1. Disable notification requests

Have you ever answered “Allow” when a site asks if it can send you notifications? I have not. If you have grown tired of repeatedly answering “Block” to this question, there is a way to prevent sites from even asking.
Enter about:config in Firefox’s address bar and click the I accept the risk button. Search for dom.push.enabled and double-click it to switch its value from true to false.


2. Disable location requests

Many sites also ask for your location, which might be helpful for some types of sites (weather, mapping and so on) but certainly not for all that ask. If you want to disable all sites from requesting to know your location, go to about:config, search for geo.enabled and set its value to false.

3. Disable camera and microphone requests

You probably get fewer requests from sites asking to use your computer’s webcam and microphone, but you can shut off these requests in about:config, too. Find media.navigator.enabled and media.peerconnection.enabled and set the values to both to false.

What are your favorite Firefox features? Tell us about it in the comments below!

App of the Week – Tripit


By Jeff Richardson of iPhone J.D.

Review: TripIt Pro — notification of travel delays and cancellations, and other travel assistance

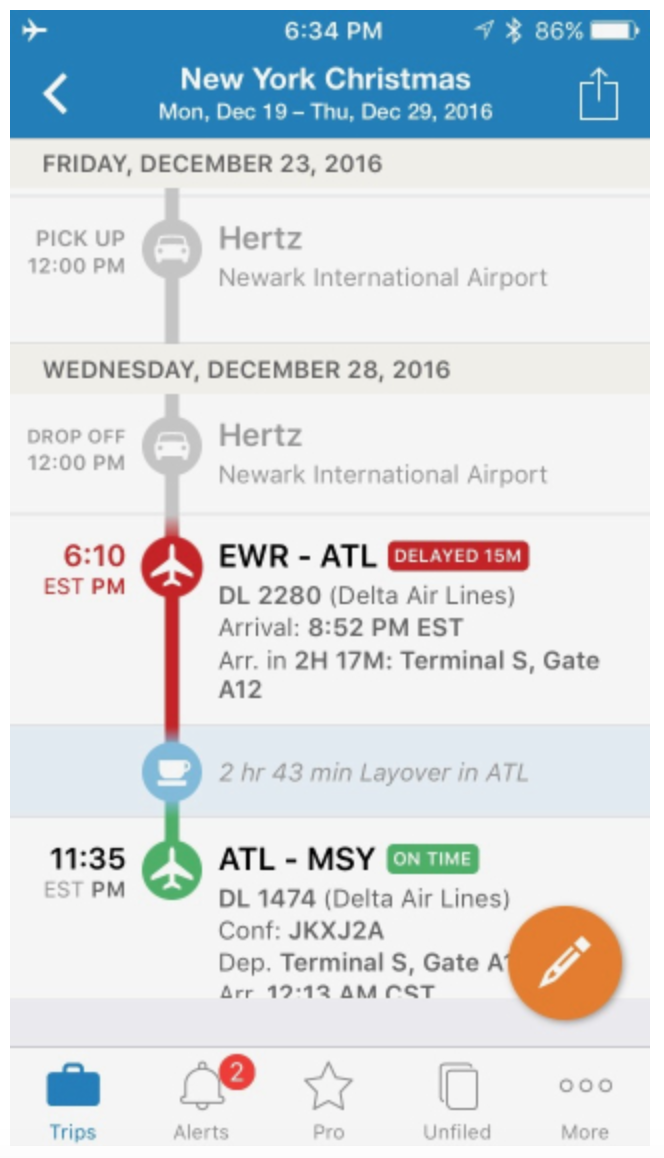
I’ve been using the free TripIt service for many years. I reviewed TripIt back in 2013, and while the service and the app have improved since then, the basic idea is the same. When you make a travel reservation and receive the email from the airline, hotel, rental car agency, train, etc., you simply forward that email to TripIt. The service recognizes you from your email address, reads and understands the content of those emails, and prepares an online itinerary for your trip. With the free TripIt app on your iPhone (or iPad), all of your travel info is in one place. Thus, if you are in the middle of your trip and need to find the name or address of your hotel, or a reservation number, everything is in one place in the TripIt iPhone app. It is a like a virtual travel agent which provides all of the core basic features. I love the service and recommend it to everyone.

TripIt Pro costs $49 a year, and it adds premium services to look out for you before and during your travel, much like a more sophisticated travel agent might do. The company gave me a free demonstration account earlier this year so that I could try it out, and I’ve used the service in connection with several trips over the Summer, Fall and Winter of 2016. I enjoyed the service, and I think that it is worth it for any frequent traveler. Here are the key features of the service.

Alerts

TripIt Pro constantly monitors your travel reservations, and if anything changes, you are notified immediately. The value of this service to you will of course depend upon whether anything goes wrong during your travel. If something does go wrong, TripIt Pro is incredibly valuable and the service can pay for itself with just one alert.
In June of 2016, this feature was incredibly valuable for me. I was traveling to Miami along with many other attorneys at my law firm, and I was on an early morning flight. When I woke up, I saw an email from TripIt Pro alerting me that my direct flight had been cancelled.

Flight delays and cancellations happen far more often than any of us would like. But with immediate notification of any problems, at least you can be one of the first in line to make alternative arrangements.

The email gave me a link to get a list of alternative flights, and included phone numbers for the airline to make changes.  Even though the airline itself never sent me a notification of the cancellation, TripIt Pro gave me the information that I needed to call and book an alternative flight.  The alternative flight was inconvenient — to go from New Orleans to Miami, I had to first fly to Dallas — but at least I was able to (barely) make my meeting in South Florida later on that day.  Many of my partners didn’t find out about the cancellation until they got to the airport, at which time many of the alternative flights were already taken, and some of them missed the meeting entirely.

TripIt Pro gives you other flight alerts as well.  It tells you when it is time to check in — something that most airlines tell you too, but the TripIt Pro email usually arrived before the airline one did, if that makes a difference to you. 


Connection Summary

Because I don’t live in a city with a major hub airport, a large number of my flights involve connections through cities like Atlanta. When I land, I want to know information such as the time of my next flight, the gate at which I will be landing, and the gate out of which my next flight will leave. Of course virtually every airline has its own app or website that you can manually access to load all of this information, but sometimes those apps are slow to use. TripIt Pro sends you an email immediately upon landing on your first flight with all of the information that you need to make your connection, including gate information and whether the next flight is on time.


I found it very convenient to have this connection information pushed directly to me so that I didn’t’t have to do any extra work to find the key information that I needed.

Seat Tracker

I’ve been lucky enough for the past few months to get a good seat at the time that I booked my flight. If you are not as lucky, TripIt Pro includes a Seat Tracker service. Tell the service what kind of seat you are looking for (exit row, aisle, window, specific cabin, front of the plane, etc.) and TripIt Pro will notify you when that seat becomes available. You’ll have to contact your airline to make the change, but at least you will know when it is the right time to do so.

Etc.

TripIt Pro offers other features that didn’t appeal to me, but maybe they would appeal to you. A Point Tracker service lets you track your travel points in one spot. (I find it more useful to just manage this through each specific airline, hotel, train, etc. service.) A flight refund service alerts you if a cheaper flight becomes available and you are ever eligible for a refund. (Does this ever really happen for anyone?) A sharing feature let’s you share travel information with others. (Even with the free TripIt service, I just use the TripIt website “print” my travel itinerary to a PDF file and then I share that PDF file with others, without using the Pro sharing features.) And there are some discounts for other travel services if you use TripIt Pro.

Conclusion

It is nice that TripIt Pro offers additional features, but I think for most people the question is whether it is worth $50 a year to you to get immediate notification of delays or cancellation in your travel plans. If you travel often, and mentally divide up that $50 price among each of your different flights, then I suspect many frequent fliers would consider this a bargain. Even just one cancellation can cause a lot of distress for you, and with an immediate alert at least you can start working on a solution to the problem ASAP. The other TripIt Pro features are not in themselves worth $50 to me, but they are nice bonuses that increase the overall value.

Everyone who travels should check out the free TripIt app. If you are a frequent traveler, I encourage you to consider adding the TripIt Pro service.

Click here to get TripIt (free) – iOS
Click here to get Tripit (free) – Android

Do you have a favorite travel app? Tell us about it in the comments about it in the comments below!